Sunday, December 30, 2007

gifts for Trixie

Okay, I admit it, the first of Trixie's gifts is a bit of cheating. I didn't make the dress(it came from the thrift shop), but I added a few flower shaped yo-yos with some vintage buttons in the centers. The angle of the photo doesn't show that the dress' buttons are also flower shaped. And the colors are a bit off here, but it looks pretty cute in person. She likes anything that requires the wearing of tights -the better to be like her big sister.


Here's the other quilt that I should have started when I actually bought the fabric (months and months ago). Let's just say I was waiting for inspiration to strike - a few weeks before I had to wrap it. Like the Dick and Jane quilt, this one was all about the fabric. Fortunately, the large prints were available in a wider width(54") and I didn't have to piece the backing. That's actually what determined the size of the quilt. Again, this one only has a few pieces on the top - nine. The sock monkey came from a kit and was actually finished in early December. Don't care to make another of those. Hand sewing knit fabric isn't high on my lists of enjoyable crafts.
The rick rack came out of my stash and was added after I had finished the top. It wound up giving me the answer to how I'd quilt the border. I drew a template mimicking its shape and free motion quilted some rick rack in the border. The center portrait fabric was quilted on the black lines with mono filament thread.


Merry Christmas to my little monkey.


gifts for Ellie

This is the year Ellie decided that dolls might be as nice as stuffed animals. She asked Basia for an American Girl doll that looked like her this Christmas and that's exactly what she got. Around the same time she came home with a copy of The Princess and the Pea from the school library. The version below came out about a year ago and I've been dying to get it for her. Tree Fall makes some lovely sets to go with the story, but I needed mattresses that fit her doll bed and a dress to fit her new doll. Twelve "feather beds" are a good way to use up some fabric you've had forever. The dress also falls under the "use what you have" category(I chose green because the princess in the story has a pea green dress). I wish it's small size related to a short amount of time to make it. It took as long to make as a full-sized one. The pea is of felted wool and has a little organdy bag to hold it. (Any bets on how long it will take for the pea to get lost?)


A new set of winter stitchettes showed up to join their friends. I'm not sure which one I like best - the ice skater (who has teeny marshmallows in her cocoa) or the little shopper (her bag is a bit hidden). These were sewn near the beginning of the year, back when I was still trying to keep myself from being overwhelmed this Christmas. A plan like that only works if you stick to it. Oh well.


And finally, why I was still sewing at noon on Christmas Eve-Ellie's lap quilt. The fabric was bought this summer with only a vague idea of how this would come together. I knew it would be simple in design because it was the fabric I was in love with and I didn't want to distract from it. The top only has 13 pieces in it with the sizes being determined by the yardage I had. The rick rack was in my stash and added some much needed color to the top. My favorite print is the multicolored backing. All prints, but the black with white polka dots(which reminded me of old-fashioned composition books), are from the Dick and Jane collection. I channel quilted the center on the diagonal, the black inner border has been quilted in the ditch and the side borders are channel quilted. The storyboard corners have been stipple quilted around the center design.


The perfect lap quilt for a little girl who's learning to read.


Friday, December 28, 2007

gifts for Glenn

Have you read The Indian in the Cupboard? Glenn loved it, so I set about finding a cupboard to make one for him. This summer I came across this at the salvation army. It used to be a distressed seafoam green color with a star nailed to the front.


The star got pried off, white paint applied, and a hole was drilled for the key. I can't remember for the life of me where I got the key - it's been hanging around my craft stuff forever and may actually work on the basement door of our old house. A red ribbon was slipped through the key to complete the transformation. The rest is up to Glenn's imagination. It has just enough room in there for a varied assortment of dime store indians, cowboys and the occassional knight or dragon.

Next up is a chef's apron to match the two I made for Chris. There's a large patch pocket on the front with a loop for a kitchen towel. The fabric is a heavy twill.


What can you embroider for a ten year old boy? An alien, of course. Just a little reminder of Halloween this year. The pillow cover was bought at the thrift store for $.50. I drew an alien's head on it with a chalk pencil and split stitched away. The eyes are black, wool felt blanket stitched in place.


He seemed pretty happy with it all. It's kind of hard to compete with Santa when he brings a Wii for the family, though.

Thursday, December 27, 2007

for the fashionista on your list

What do you give to a woman with an impeccable wardrobe and a collection of Manolo Blahniks?

A book on Channel, Manolo Blahnik Drawings, and shoe bags for her travels to Europe and other parts of the globe.

Buttons were added to the drawstring closures like a slide to keep them closed. They also distinguish a pair since I used the same fabric for both sets.

This button is a reproduction style that's at Joann's.


This one is from a bridesmaid's dress. (Bonus points to any friend that can identify the wedding.) I thought Brooke would like the bling factor these have.

And to round out the gift - Ellie sewed a pair of sachets to tuck into some beautiful shoes at the end of a long day.


Wednesday, December 26, 2007

christmas tree skirt


Jackie, you ask, I answer. I meant to post about this before I found myself in a self-imposed crafting hell, forced to spend every moment of the days leading up to Christmas sewing.
I made this back in the days when there was only one child in the house and I had far more time. I can't remember the exact year though. I'd have to go through our old Christmas photos and see what year it shows up. Before this I used to put a large piece of burlap under the tree stand and then wrapped it around the stand with some twine, like a tree from the nursery.
No pattern for this one. High school geometry came in handy to get started. I folded a large square of muslin in quarters and then eigths. Sort of like making a paper snowflake. Then I took a yardstick and placed one end at the skinny point on the fabric. I measured down one folded side to the length I wanted for the radius of the skirt. (I've lost Trish and Norma at this point.) Then slowly and carefully swung the other end of the yardstick like a giant compass and lightly chalked the arc that was made. Clean up any breaks in the chalkline and generally fix it up. Next came a hole for around the base of the tree. Did the same thing, just much closer to the point (remember that how far down you measure the radius will only be half of the opening's final diameter). (I think Angie has also shut down by now and just wants to look at the pictures.) If you're being really picky remember to add seam allowances to both measurements. Once I'd marked both arcs, I cut through all layers on the chalk line. Then I opened up the fabric (again, mine was simple unbleached muslin) and had what looked like a large donut. (Trim up the edges if your arcs didn't form the perfect circle. )


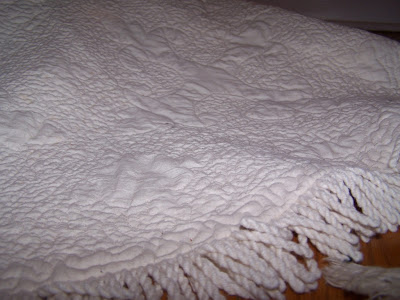
This is a quilted tree skirt, but I didn't want a traditional quilt binding at the edges so it was done a bit differently. Instead of doing the quilt 'sandwich' first and quilting before finishing edges, I did it in reverse. A seam was cut from the outer edge to the inner edge of the skirt so it could be put around the tree. Then I used this piece as a pattern to cut out another piece of muslin for the backing and a piece of cotton batting to go inside. It also has a few trims that were put on during this part of the construction process. The cotton rope trim was pinned along the edge of my top piece facing toward the center, so it would point out when the skirt was completed. There are also some pieces of twill tape on both sides of the long opening so the skirt can be tied behind the tree. I basted all of the trims on first. Next, a sandwich was formed, but in this order - batting on the bottom, then the top piece of muslin with the trim facing up, then the backing piece of muslin(muslin has no right side here, so that didn't matter, but if your fabric has a right and wrong side, their right sides should be together with the wrong side of the backing fabric being on the top of the whole sandwich). Stitch all the way around the edges in one continuous line started on a long edge (where the twill tape is) and leave an opening for turning it right side out. Turn the whole thing(clipping corners and curves, blah, blah, blah) and press. I edgestitched along the edges with the twill tape to close up the opening.
Quilting came last. Because I couldn't use temporary spray adhesive to baste the skirt, I pinned it. For this project I used a method for quilting that has you pinning pieces of paper that you've needle punched with your design to the quilt. (This method is a whole post on its own.) Then you free motion quilt through the paper. If you'd prefer to draw the design onto the fabric, I'd do it long before the pinning. Once that was set, I free motion quilted the motifs and then stipple quilted all the spaces between them. This was one of my very first quilting projects and it took awhile. I also refuse to show the back with several pleats in the fabric where it wasn't basted well enough before I did all the stipple quilting. Luckily, only one side shows when it's out and when you wash and dry a piece like this, it puckers up nicely and hides any stitches that don't look perfect. At one point, I had imagined I would quilt some Beatrix Potter figures onto the skirt to go with the cushions I've made. Never happened. I finally realized that a stencil-like shape of her work would look awful compared to the detail in her paintings.
It feels like it took as long to write how I did this as it took to actually sew it.


Proof that I got the girls' lap quilts done in time to open on the big day and to use for movie watching that night:


More on the gifts we made in the coming days.


Hope you had a wonderful holiday.

Friday, December 21, 2007

woolen goodies

A few more items from my Christmas year round challenge. I'd like to say these were inspired by Turkey Feathers, but they're actually a pretty close replica to a set she made. I fell in love with hers and couldn't think of a way to make them any nicer than she had, so... (The pattern is a free one from Little Birds Handmade.)
The materials were things I had on hand - vintage lace, buttons, and fabric for the tree bottoms from my Grandma Bev's stash. The evergreen design I drew freehand. The wool felt was washed and dried before being sewn to give it a more mottled look.
The plan had been to make a set of these for the girls' room in cheerier fabric. I'll be adding that to a list of things to do in 2008 because it isnt' happening between now and Tuesday.


I also started to cut into the pile of wool sweaters that I thrifted ages ago. It's about time - sweaters take up an ENORMOUS amount of space. They went straight from the thrift shop into the washer and dryer on hot. Pretty cool how they come out so thick and felted. The mittens below are the sleeves of one of them. They make a cute decoration, but I need some serious work on my pattern drafting for these if I intend to make a pair that can actually be worn by someone other than lobsterboy. There's no room for the palm of the hand before you hit the wrist portion.


Christmas needs to get here now. I have very little to post before I start ruining surprises and put gifts up.

Wednesday, December 19, 2007

can you believe he goes to a public school?

Here's a little diversion while I continue to work on the list of things I can't post pictures of until after the holiday.
We love the Magic Cabin catalog around here. Another arrived before the holidays with a picture of a star shaped doll(I'd have linked to it, but it's no longer on the site). Glenn thought it was cute and wanted to order it - until he read the description and found it was much larger than he pictured it. No problem. "I think I can make what I want, mom."
Felt was pulled out, freezer paper templates explained and promises to use my very sharp scissors VERY carefully were extracted.


A little wooden bead head was pulled out from the bunch I thrifted a few months ago and set atop a pipe cleaner armiture. (He was most proud of the structural work in this project.)


I edgestitched all of the pieces for him(I'll let him touch just about any tool other than my machine - not ready for that just yet) He fit them over the pipe cleaner and glued it all in place. Trixie's little, 2 year-old hand gives some good size perspective.


There are sketches for a whole series of these...

Monday, December 17, 2007

spaceboy

No, this post isn't about Glenn when he has to get up early in the morning. This little guy is from a pattern by Wee Wonderfuls. He'll be heading off to a cousin's son in the next day or two.


I lucked out finding some fat quarters on clearance at Joann's that had a space theme(I found others with robots, but that's a whole different post). I fussy cut a piece and appliqued it to a store bought tee because you really need to match your toys, don't you?


The vintage button is out of my stash. All of the wool felt is from the shop. Because the recipient just turned one, I blanket stitched the belt all the way around and the button has been sewn on more securely than I've ever sewn anything in my life. The pattern has some very cute goggles, but I skipped those. I have a feeling they'd be taken off and flung on the floor at every opportunity by a kid that young.


Beam me back to my sewing room, I have a lot more to get done by next Tuesday.


Saturday, December 15, 2007

christmas cushions

I worked on some of these so long ago that I can't even remember the year(the only one I dated is marked '04), but I do know that they were sewn into cushions only within the past few years. All are Beatrix Potter designs done in cross stitch. Someday I'll work my way through the whole book of these patterns. They're all backed with velvet leftover from various other home dec projects or small thrifted pieces. I worked on aida cloth for the first two and on linen for the third.
The Rabbit's Christmas Party(9x14)


The Bunnies' Christmas Stocking(10x10)


The Happy Pair(7x10)


Friday, December 14, 2007

christmas past

The craft world is going nuts with advent calendars this year. While I'm tempted by them all, I can't improve on this one for sentimental reasons.

My grandmother made one just like this for my sisters and me in the early 70's. When my mother started cleaning stuff out of her house there were a few things all three of us were willing to fight to the death over. This was one of those things. Unfortunately, I didn't draw the right straw when it was decided that was the only fair way to divvie up the good stuff. Cindy won and I figured that was the end of that. The following year she handed both Heather and I oddly shaped packages on Christmas day. Inside were two calendars identical to the original. She'd spent the previous year recreating them for us.
Down to every detail.
Each ornament had been recreated - including my favorites -
the pinecone


the drum

and the dove.


Peace.

Thursday, December 13, 2007

notes to self

Okay Angie and Jackie, you wanted organizational stuff, this is all I can manage when I'm not holed up in the basement trying to finish up gifts - unless you want pictures of the million lists I've made - which, sadly, do not magically get all the items done just by writing them down.


I started doing this a few years ago. Instead of opening the box of garland every year and spending hours trying to figure out where each piece fit(and swearing a lot), I labeled them one year. When each one comes down in January, the tag gets tied on with bright yarn before I cram it back in the bin. The following year, I'm greeted by these little cards that make decking the halls much faster.


I don't even remember writing this note to myself. I must have seen something in a magazine after I'd already decorated or taken things down.


I'm pretty happy with the results. It's like a little decorating time capsule.


This has nothing to do with organization, it's just to make Angie smile after oral surgery. It's my go-to outfit for all holiday parties this year. I have to make sure I'm fashionably late though, so everyone can see the coat in all it's glory before I have to remove it. It belonged to my grandmother and has awesomely huge buttons covered in the same velvet. The collar is like a scarf that runs though a beautiful bound buttonhole on one side. The 3/4 sleeves show off C's grandmother's long black gloves. And to top the whole outfit - my new sequined Vera Bradley anniversary edition bag.


My face is not in the picture because I forgot to make sure my son was standing on a chair when taking the picture. Upward angle = many chins.

Wednesday, December 12, 2007

elf stitchettes

These were the first project in my ill-fated "Christmas year round challenge". They're the darling elf stitchettes from Wee Wonderfuls. They were stitched onto some vintage linen toweling from a thrift store. The toweling has that great stripe on both sides. Both will hang in the kitchen this season. It cracks me up that the kids have gotten so used to seeing me sewing her designs that even Glenn offhandedly says "oh, are you making more stitchettes?" when he sees me working on them.


My favorite part - a tiny stitched robot.

Tuesday, December 11, 2007

decking my halls

Inspired by Sarah Lugg's work and my love of tags...


Other than the tags (which I bought specifically to make this) the other items are from my craft stash or the yard - organdy ribbon, silk flowers/leaves, vintage buttons, shells and twigs.


Saturday, December 8, 2007

flashback

Did you grow up in the 70's? Look familiar?


I took one look at this fabric from Kim's grandmother's stash and it felt like going back in time about 30 years. I'm not sure what she thought of my taste when I said I'd take it. I'm not alone though. Pam liked it too and this is the result:


A messenger bag on an acid trip.


The bag is a variation on Angry Chicken's clutch from Bend the Rules Sewing. This one is quite a bit larger than her pattern and I've added the long strap so it can be worn across the body.


The lining was another piece of thrifted, non-natural fabric that I'm hoping never to work with again. It shredded at the edges, slipped all over and was generally a pain. The only thing it had going for it was that it cost less than a quarter. The button is a vintage cover-it-yourself deal. I just centered one of the paisleys over the middle of it. (Hint for Carol - when you cut out your circle of fabric to cover the top of the buton, spray the back with temporary adhesive spray and it will stay in place when you're stretching it over the prongs.)


Sorry about blinding you with the next photo. It's a detail of the stitching holding the strap on the back of the bag.


Go rub your eyes now.

variations on a theme

Around August and September I got on a bit of a roll with tote bags. Trixie's farm tote and playmat got posted awhile back and these are pretty similar in look and construction.
The following two went to my mother's cousins, both of whom are musicians. They also repair stringed instruments. Mom and I spotted the themed fabric in a quilt shop in Mitchell, SD while we were on vacation visiting this side of the family. Every inch of two fat quarters were used for this project. The rest of the fabrics were out of my stash (including some leftover batting from quilts I've made). The buttons are all vintage. The glitzy set went to Mary, who wears some sort of sequin or rhinestone on her clothing everyday. (Mom said they were a big hit.) I thought the other mix of buttons reflected Liz's cool, eclectic sense of style. They're both fun, interesting women and the most enjoyable part of the project was coming up with a way to distinguish the bags to reflect the both of them.
Both bags were quilted like the farm tote, but the top portion was stipple quilted by machine and the bottom portion was channel quilted. Twill tape divides the two. It was also used for the handles with some fusible interfacing to give them more body and stick them together before stitching down both sides and the middle.


The lining was a thrifted, non-natural piece of fabric and I'm glad I don't have to work with it ever again. It matched the cream in the exterior though and I'm all about using up what I have, so I plowed ahead. A small amount of themed fabric was leftover to make pockets on both sides of the lining after I determined the final size of the totes. (I based the dimensions on the size of file folders and sheet music.) The other pocket was divided to hold a pen and small pad of paper.


This one was created to hold a learning toy of Ellie's that's forever laying out because it doesn't fit nicely in anything. The fabric is from the Building Blocks collection and I've now lost track of how many things I've sewn with these prints.

Yep, more twill tape on the front dividing the prints with some rubber stamping to embellish it. This was another use what I have project - right down to the interfacing which would not have been my first choice. It's a bit on the stiff side, but I didn't relish the idea of quilting a bag that might get trashed. A little too much effort for something that was intended to be a quick fix.